Pipe Thread Size Identification: A Step-by-Step Guide for Professionals
- 1. Why Correct Thread Identification Matters
- 2. Tools You Will Need
- 3. Step 1: Tapered or Parallel
- 4. Step 2: Determine the Thread Pitch
- 5. Step 3: Determine the Thread Size
- 6. Step 4: Designate the Thread
- 7. Common Thread Standards at a Glance
- 8. Key Visual Identification Tips
- 9. Common Pitfalls to Avoid
- 10. Conclusion
1. Why Correct Thread Identification Matters
Identifying pipe thread size and type is one of the most common challenges faced by maintenance professionals, equipment operators, and engineers. A mismatched thread can lead to leaks, equipment damage, and even catastrophic system failures. This guide provides a clear, systematic approach to determining pipe thread size, covering the essential tools, step-by-step identification process, and the key differences between the most common thread standards.
Using the wrong thread type during installation can compromise seal reliability and pressure-holding capacity. Correct assembly maintains pressure and reliably seals a fitting, making it safe for humans and equipment. Conversely, selecting the wrong part can result in damage to the thread during installation and costly, time-wasting maintenance.
2. Tools You Will Need
Before starting the identification process, gather these essential tools:
- Calipers (ID/OD) – capable of measuring both inches and millimeters
- Thread pitch gauge – capable of measuring both inch and metric thread pitches
- Reference charts – thread identification guides from fitting manufacturers
3. Step 1: Determine If the Thread Is Tapered or Parallel
This is the most fundamental distinction and will eliminate three of the six possible thread forms.
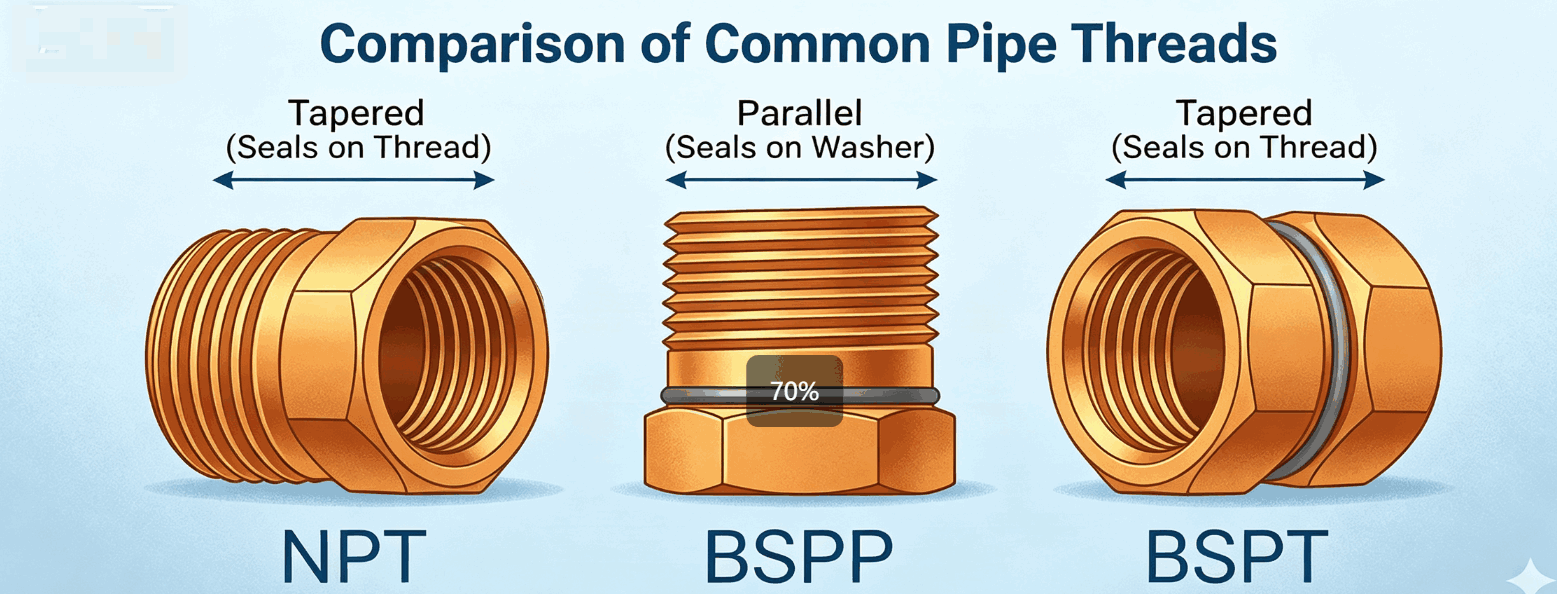
Tapered threads get smaller in diameter toward the end of the fitting. Parallel (straight) threads have the same diameter from end to end.
In many cases, this can be accomplished by visual inspection alone. If not obvious, use the parallel jaws of a caliper to make a comparison. Additionally, the presence of an O-ring or the removal of a tube nut is usually an indication that the male thread is parallel.
Quick Reference:
| Thread Type | Tapered or Parallel? |
|---|---|
| NPT / NPTF | Tapered |
| BSPT | Tapered |
| BSPP | Parallel |
| UN / UNF | Parallel |
| Metric Parallel | Parallel |
| Metric Tapered | Tapered |
4. Step 2: Determine the Thread Pitch
Pitch is defined in terms of threads per inch (TPI) for inch threads or the distance between threads in millimeters for metric threads.
Using a Thread Pitch Gauge: Place the gauge teeth on the threads until a tight fit is found. Ensure there is no gap between the teeth of the gauge and the fitting. It is much easier to compare threads against a lighted background. Because some thread pitches are nearly identical, try several gauges before deciding which one fits best.
Common Pitches by Thread Type:
| Thread Standard | Common Pitches (TPI) |
|---|---|
| NPT (1/8" – 3/4") | 27, 18 |
| NPT (1" – 2") | 11.5, 14 |
| BSPP / BSPT (1/8" – 3/4") | 28, 19 |
| BSPP / BSPT (1" – 2") | 11 |
| UN / UNF (varies by size) | 20, 24, 28, 32 |
5. Step 3: Determine the Thread Size
There are two methods for sizing threads: one for pipe threads and one for non-pipe threads.
For Pipe Threads (NPT/NPTF, BSPT, BSPP)
A good rule of thumb for pipe sizes up to 2 inches nominal is to measure the actual outside diameter (OD) and subtract ¼ inch. Round off for the nominal pipe size.
For example:
- OD measures approximately 0.405" → nominal size = 1/8"
- OD measures approximately 0.540" → nominal size = 1/4"
- OD measures approximately 0.675" → nominal size = 3/8"
- OD measures approximately 0.840" → nominal size = 1/2"
Alternatively, compare the part against a nominal size profile chart from a fitting manufacturer.
For Non-Pipe Threads (UN/UNF, Metric Parallel, Metric Tapered)
Measure the major diameter (OD) of the threads directly with a caliper. This measured diameter is the actual thread size.
Important Note: For pipe threads, "nominal size" refers to the approximate inside diameter of the pipe, not the actual outside diameter. This is why the ¼-inch subtraction rule works.
6. Step 4: Designate the Thread
This final step is not part of the identification process itself—it's a way to designate thread types in a standard format. Designations should indicate thread size, type, and, in some cases, pitch.
Example Designations:
- 1/4-18 NPT – ¼ inch nominal pipe size, 18 threads per inch, National Pipe Taper
- G 1/4 – ¼ inch BSPP (parallel) thread
- R 1/4 – ¼ inch BSPT (tapered) thread
- 7/16-20 UNF – 7/16 inch major diameter, 20 threads per inch, Unified Fine
7. Common Thread Standards at a Glance
| Standard | Full Name | Tapered? | Thread Angle | Sealing Method |
|---|---|---|---|---|
| NPT | National Pipe Taper | Yes | 60° | Thread interference + sealant |
| NPTF | National Pipe Taper Fuel | Yes | 60° | Dryseal (no sealant required) |
| BSPT | British Standard Pipe Tapered | Yes | 55° | Thread interference + sealant |
| BSPP | British Standard Pipe Parallel | No | 55° | O-ring or bonded washer |
| UN/UNF | Unified Fine | No | 60° | Not a pipe thread – uses other sealing methods |
| JIC | Joint Industry Council (37° flare) | No | – | 37° metal-to-metal flare seal |
8. Key Visual Identification Tips
- NPT threads have a 60° angle with flattened peaks and valleys (Sellers thread form)
- BSP threads have a 55° angle with rounded peaks and valleys (Whitworth thread form)
- Male tapered threads (NPT/BSPT) can easily be identified visually by the conical shape of the threads
- JIC male has straight threads and a 37° flare seat
- ORB (O-Ring Boss) can be identified by the visible O-ring at the base of the male thread
9. Common Pitfalls to Avoid
- Do not confuse NPT and BSPT – They appear similar but have different thread angles (60° vs 55°) and will not seal properly
- Do not force mismatched threads – Forcing a National style thread onto a British style thread will damage both
- Do not assume pipe size is the OD – Pipe size refers to nominal diameter, not actual outside diameter
- Avoid using worn fittings for identification – If the fitting is worn, you may have difficulty finding a match with a pitch gauge
10. Conclusion
Determining pipe thread size doesn't have to be a guessing game. By following this four-step process—determining taper vs. parallel, measuring pitch, determining size, and designating the thread—you can accurately identify almost any pipe thread. With the right tools (calipers, pitch gauge, and reference charts) and a systematic approach, you can avoid costly mismatches, ensure leak-free connections, and maintain safe, productive operations.
Closed-Loop Hydraulic Hose Systems: Design, Selection, and Performance Guide
Hydraulic Hose Systems in Injection Molding and Presses: A Guide to Performance and Reliability